Many years ago I played the game Little Big Adventure but never got around to finishing it. Now that MSDOS has long gone I set about running it on Ubuntu 10.04 (Lucid Lynx). The game plays perfectly but requires a little tweaking.
1. Create an ISO From your CD
$ dd if=/dev/dvd of=/home/yourusername/.dosbox/lba.iso
2. Install DOSBox
$ sudo aptitude install dosbox
3. Configure DOSBox
Create a directory for the DOSBox C drive:
$ mkdir /home/yourusername/cdrive
Edit the file ~/.dosbox/dosbox-0.73.conf:
$ nano ~/.dosbox/dosbox-0.73.conf
C Drive
Add this line at the end of the config file to make the C drive mount when you start DOSBox:
mount c /home/yourusername/.dosbox/cdrive
Sound Changes
When I first ran the game the sound was very glitchy and horrible. I made the following changes in the config file and it sounded perfect (8 bit tastic).
In [mixer]
rate=44100
blocksize=8192
prebuffer=50
In [sblaster]
oplrate=44100
Load LBA on Startup (optional)
If you want to use DOSBox only for LBA then you might as well load LBA automatically when DOSBox starts. To do this add the following lines to the bottom of the config file:
imgmount d /home/yourusername/.dosbox/lba.iso -t iso -fs iso
c:
cd relent
relent
4. Installing the Game
Start DOSBox
$ dosbox
From this point on run commands in the DOSBox window.
Install the Game
Z:\> d:
D:\> install
Choose to install to C drive
Configure the Game
Z:\> c:
C:\> cd relent
C:\RELENT> setup
Set the following options:
> Music Sound Card Configuration
>> Sound Blaster 16 (OPL3)
>>> 220h
> FX Sound Card Configuration
>> Sound Blaster 16
>>> 220h
> Speech Configuration
>> Keep Speech Files on Hard Disk - YES
> Save Parameters
> Quit to DOS
Exit from DOSBox
C:\RELENT> exit
Copy the Voice Files
Back in the Linux terminal copy the voice files to the C drive folder.
$ cp -R /media/cdrom/LBA/VOX /home/yourusername/.dosbox/cdrive/RELENT
6. Start the Game
$ dosbox
If you chose not to start the game on DOSBox startup then run the following in the DOSBox window.
Z:\> c:
C:\> cd relent
C:\RELENT> relent
Enjoy
Tuesday, 5 October 2010
Thursday, 3 June 2010
A while since progress
It's been quite a while since I last posted here. For the most part work on my RepRap has slowed a lot since the end of last year. Reasons for this seem to be: not having any outside in my new flat (except a large public park where I saw and drill on occasionally while, getting some odd looks), and Might as well blame it on moneygeddon too if that is still trendy.
One of my biggest problems has been the generation one pic electronics I am still trying to use. While I am appreciative of the work that has gone into keeping the SNAP support in the current RepRap host, I have have spent many days getting things 'almost' working, then packing up and leaving it for a few more weeks while making no real long term progress.
So today I decided to invest in some of Kimberly's Techzone boards. They will be much easier to debug and I will be able to work with all the bleeding edge techniques that I was denied with the PIC electronics.
I have also tried to use my own Python SNAP stack for FFM printing with my machine, but there are a few deep issues especially in regards to performance regarding this stack that I have still not got around to fixing, and do not believe it is usable to FFM as a decent speed. It is still pretty handy for all other manner of uses for a Cartesian machine and for testing and I will be bringing it to the Generation 3 electronics when I receive them.
I have plans to re-purpose my generation one electronics either on a RepRapped mini mill or a commercially purchased one (Sable 2015)
Wednesday, 7 October 2009
repstrap moving about
It's alive!
I am going to finish that Y axis motor bracket :)
The spanner is because the X carridge design relies on some off centre weight, which is normally my extruder that is currently broken.
I am going to finish that Y axis motor bracket :)
The spanner is because the X carridge design relies on some off centre weight, which is normally my extruder that is currently broken.
Awesome picture of the night sky
You may have seen this story on slashdot but been a little annoyed when you couldn't just download a nice big image and instead had to look at it in some stupid flash or js viewer.
I'm not going to upload any images but I might just leave this here.

I'm not going to upload any images but I might just leave this here.
Making real use of Python in gedit
If you are a fan of gedit, and a fan of Python like me then the chances are that you have tried out the gedit Python console plugin at some point. Years ago I tried it out but realised it was really aimed at plugin developers and not at people wanting a quick and easy way to manipulate data in the text editor.
Last week I wrote a simple gedit plugin and so learned about the API and how to manipulate text in the editor. Even once I had learned about the API it still seemed far to complex to be usefull for quick data manipulation of an open file, so I decided to make a simple script that made things simpler, and makes the gedit Python console do what I wanted all along.
Get It
Save this script as ~/.gnome2/gedit/plugins/doc.py
Now open up the Python console in gedit and type import doc
Use It
import doc
d = doc.Doc(window)
d.set_lines( ['one', 'two', 'three'] )
d.append('\n')
d.append('four')
lines = d.get_lines()
lines.reverse()
d.set_lines(lines)
Now you can use regular expressions on you're open documents :)
Documentation
doc.Doc:
|
Saturday, 26 September 2009
Bluetooth scanning experiments
This was never supposed to be exclusively a RepRap blog, I've just never posted anything else on it before, so here goes.
I moved into a new flat that is above a high street, and noticed that there were always a lot of bluetooth devices (phones) around when I looked in the Gnome bluetooth applet.
I created a simple script that continually scans for devices and reads out people's bluetooth names out loud using festival. The next day I broke my vow to never own a Twitter account after I saw how simple the Python API was to use, so now all the names are now posted on Twitter too.
Why? It's all rather pointless, I'm sure it's been done before, but it's an interesting experiment and emphasises the privacy concerns of having your phone continually shouting out "me me me" with a unique identification number (MAC) to anyone who wants to know. I also observed that many of the bluetooth names are actually just set to the phone make and model. It's probably not the best idea to have you're rather expensive phone advertising itself as "BlackBerry 8120" or "Nokia N95 8GB".
You can see the full source here.
Sunday, 28 June 2009
Spider Grip
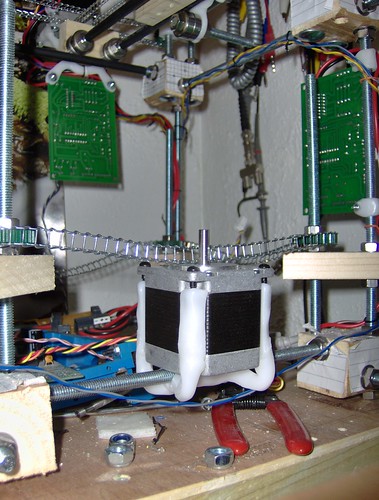
My mini Darwin design does not have enough space to put the Z axis motor in-line with one of the treaded rods, so from the beginning I had been thinking of placing the motor along one of the side rods. I have been trying to think of a good way of mounting the motor for a while now, then a few days ago I had the idea of making this 'spider grip' (it looks a bit like a four legged spider).

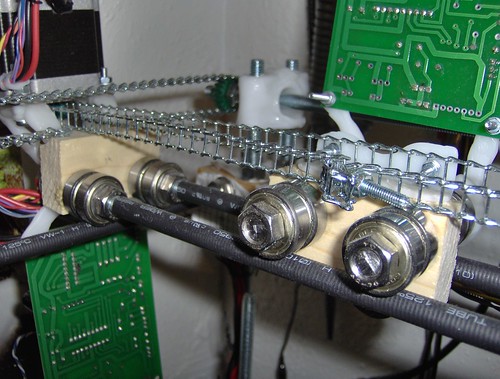
The 'legs' arch up before going to the 'body' to give some elasticity, so that when the screws are tightened the rod is held very firmly against the motor.

Here it is fitted to the machine. It gives a very firm grip, however it can be twisted fairly easily around the axis, but is firm enough to keep it in place. The only forces that will be applied to the motor when in operation are a liner force along the length of the chain, and a rotary force around the motor spindle, so no force should be present in the one direction that the motor can twist.
I've just put a load of closeup pictures of the machine onto my flickr page.
Unfortunately I've just broken my extruder, but more about that next.
The 'legs' arch up before going to the 'body' to give some elasticity, so that when the screws are tightened the rod is held very firmly against the motor.
Here it is fitted to the machine. It gives a very firm grip, however it can be twisted fairly easily around the axis, but is firm enough to keep it in place. The only forces that will be applied to the motor when in operation are a liner force along the length of the chain, and a rotary force around the motor spindle, so no force should be present in the one direction that the motor can twist.
I've just put a load of closeup pictures of the machine onto my flickr page.
Unfortunately I've just broken my extruder, but more about that next.
Subscribe to:
Posts (Atom)